Reaching C10 on a Fanless Server
Building a silent, ECC homeserver in Germany that idles at 15W, and all the ASPM, LTR and AER rabbit holes I fell into getting there.
I live in Germany. When I started planning my homeserver, that one fact drove every decision, because at 27 to 34 cents per kWh, running a box 24/7 at home gets expensive fast. The difference between a server that idles at 60W and one that idles at 15W isn’t “a few watts.” Over a year it’s real money. So before I bought anything, I spent way too long researching how to build something that wouldn’t quietly drain my bank account.
If you go down this path, the first thing to figure out is what you actually need, because everything else follows from it. How much compute? Do you need an iGPU for transcoding? How much storage, and what kind? It’s tempting to skip this and just buy parts, but the requirements are what eliminate most of the options for you.
Mine were:
- enough headroom to mess around with the occasional dev project (a k3s cluster in a VM, a temporary game server)
- an iGPU for media transcoding
- room to act as a proper NAS
- low power, obviously
Then I added one more requirement that turned out to be the hard one: it had to be silent. I live in a small apartment and the server sits not far from my bed. A loud box, something out of the Dell PowerEdge world, is great if you have tinnitus and want company. For everyone else it’s a headache. So on top of low power, I wanted fully passive. No fans.
The nice thing is that passive and low power pull in the same direction rather than fighting each other. The annoying thing is that together they shrink the parts list to almost nothing.
“Just buy an N100”
If you’ve read even a little about this hobby you already know the answer everyone gives: low power, passive, just grab a passive Intel N100 box and move on. And honestly, that’s good advice for most people. The N100 handles the typical homeserver stuff fine. Ad-blocking DNS, a media stack, a handful of Docker containers, all while barely sipping power.
Two things ruled it out for me. The first is expandability, which is limited on those little boxes. The second, and the one I actually cared about, is that the N100 doesn’t support ECC memory.
Whether ECC matters at home is one of those arguments the homelab community will never settle. Plenty of people run normal RAM for years and never see a problem. Others insist it’s mandatory for anything you care about. I’m somewhere in the middle. I ran normal RAM for years without trouble too, right up until a stick of mine went bad. After that I came around to it. ECC can catch a stick that’s starting to fail before it silently corrupts your data, and there’s a certain peace of mind in knowing bit flips are being caught. (That said, at today’s RAM prices I wouldn’t push ECC on a home user. That opinion is from before the AI memory-buying frenzy. Things were cheaper then.)
There’s also the compute ceiling. The N100 is plenty for normal use, but the moment I tried a k3s cluster in a VM or a busy game server, it ran out of breath. I wanted more room than that.
So the list was: low power, passive, ECC, an iGPU that can transcode, and some compute headroom. Basically a golden goose. Wouldn’t that be nice.
Finding a platform that does all of it
ECC usually sends people toward enterprise gear, a low-core EPYC or a Xeon. The problem is I also needed good ASPM and C-state support, and server boards almost never have that. They certainly don’t validate it.
If you’re not familiar with C-states, here’s the short version. They’re the CPU’s idle states. C0 is “running,” and every higher number (C1, C3, C6, up to C10 on these Intel chips) shuts down more of the core and the surrounding silicon to save power, at the cost of taking longer to wake back up. The deep ones are where the savings actually live. They exist because laptops need to sip battery at idle, which is exactly why they’re hit or miss on hardware meant for a rack.1
So I needed consumer silicon for the laptop-grade power management, but with ECC support. There are three ways to get both:
- Older Intel chips, up to roughly 9th gen, where the consumer parts could use ECC.
- AMD “PRO” APUs, which all support ECC on consumer boards.
- Newer Intel chips on a workstation chipset, the W680 / W880 line.
The first option is genuinely fine. An i3-9100 with DDR4 ECC is still a cheap way into a low-power ECC homelab today, just a bit dated. The AMD PRO route is good too and gets you DDR4 ECC on consumer boards. Two things pushed me to Intel anyway. One, Intel’s QuickSync is still the better transcoding engine for a low-power box, and you really want hardware transcode here. Two, AMD’s bigger compute parts use a chiplet design, and the Infinity Fabric tying those chiplets together has a high idle power cost. Even the chipsets tend to run hotter than Intel’s.
That, plus some lucky timing (the RAM crisis hadn’t fully hit yet), landed me on a recent Intel Alder/Raptor Lake part on a W680 board. W880 had been announced but you couldn’t actually buy one, so W680 was as current as I could go.
The CPU: i5-13500(T)
I went with an i5-13500(T). A few reasons it’s the sweet spot here:
- It has the largest iGPU config in the lineup, the same one the i7 parts get. That’s a real jump over something like an i3-12100 and means more headroom for concurrent transcodes.
- 14 cores and 20 threads, which is more than I’ll ever need.
- It sidesteps the Vmin/oxidation mess that hit some 13th and 14th gen chips. The i5-13500 is still an Alder Lake die, just refreshed with a new config, so it isn’t affected.
The “T” wasn’t really on purpose. I found too good a deal on a used one to pass up. While I’m here, let me kill a myth: T-series chips are not more efficient and they don’t idle any lower. They just have a lower power ceiling. They’re meant for cases that can’t dump much heat, so they’re capped, which means they clock down sooner and take longer to finish the same work. You don’t save energy, you spread it out over more time. If anything they’re often better-binned chips, because hitting a performance target at lower wattage takes a good die. You can turn a normal i5-13500 into a “T” by limiting its power states, or unlock a T by raising them. My actual advice: don’t pay extra for a T unless you’re genuinely cooling-limited and need the low TDP. I happened to be, so it worked out.
The motherboard: the W680 saga
To run ECC on an i5-13500 you need a W680 board. These get pricey, there aren’t many of them, and real-world reports of W680 plus ASPM plus low idle are rarer still. My shortlist came down to ASRock, the ASUS Pro WS W680-ACE, and a brand-new option, a CWWK W680.
The CWWK was the newest and the cheapest, and it was absolutely stuffed with features: 10G Ethernet, 12 SATA ports, 3 NVMe slots, dual 2.5G. The catch is that all those extras come from add-on controllers, a JMB SATA multiplier, separate NIC chips, and those frequently don’t do ASPM properly. On a freshly released CWWK board the odds of good C-states are slim. People with their N100 boards reported it took several firmware updates and some finicky NIC-firmware flashing to get even okay C-states. Great feature count, but if those chips are on the board, you’ll probably never see deep package C-states.
ASRock had a better reputation online, but their W680 boards are mostly industrial parts, and they deliberately hide some of the ASPM-related BIOS settings. Industrial and workstation users tend to care about stability and latency, not shaving off a few watts. With BIOS-unlock tools or a special BIOS from ASRock support, people did get lower C-states out of them, but that felt like a lot of hacking around.
And then the ASUS Pro WS W680-ACE. I found one Reddit post of the mATX version reaching low C-states, and more usefully, a HardwareLuxx forum thread comparing several W680 boards. The behaviour there was interesting: up to C10 with nothing connected, but the moment you attached any Ethernet or PCIe device it dropped to C3.
On pure stability I’d still rank them ASRock, then ASUS, then CWWK. But ASRock felt too hacky to coax C-states out of, and CWWK’s reputation made me nervous, so I went with ASUS. I figured the EU’s strong consumer-protection laws would cover me if ASUS’s support turned out to be as painful as people say. Spoiler: it didn’t, German ASUS support was actually pretty good, more on that later.
That left mATX versus ATX. I’d have preferred the mATX ACE, but it uses a vertical CPU layout that HDPlex cases don’t support, so ATX it was.
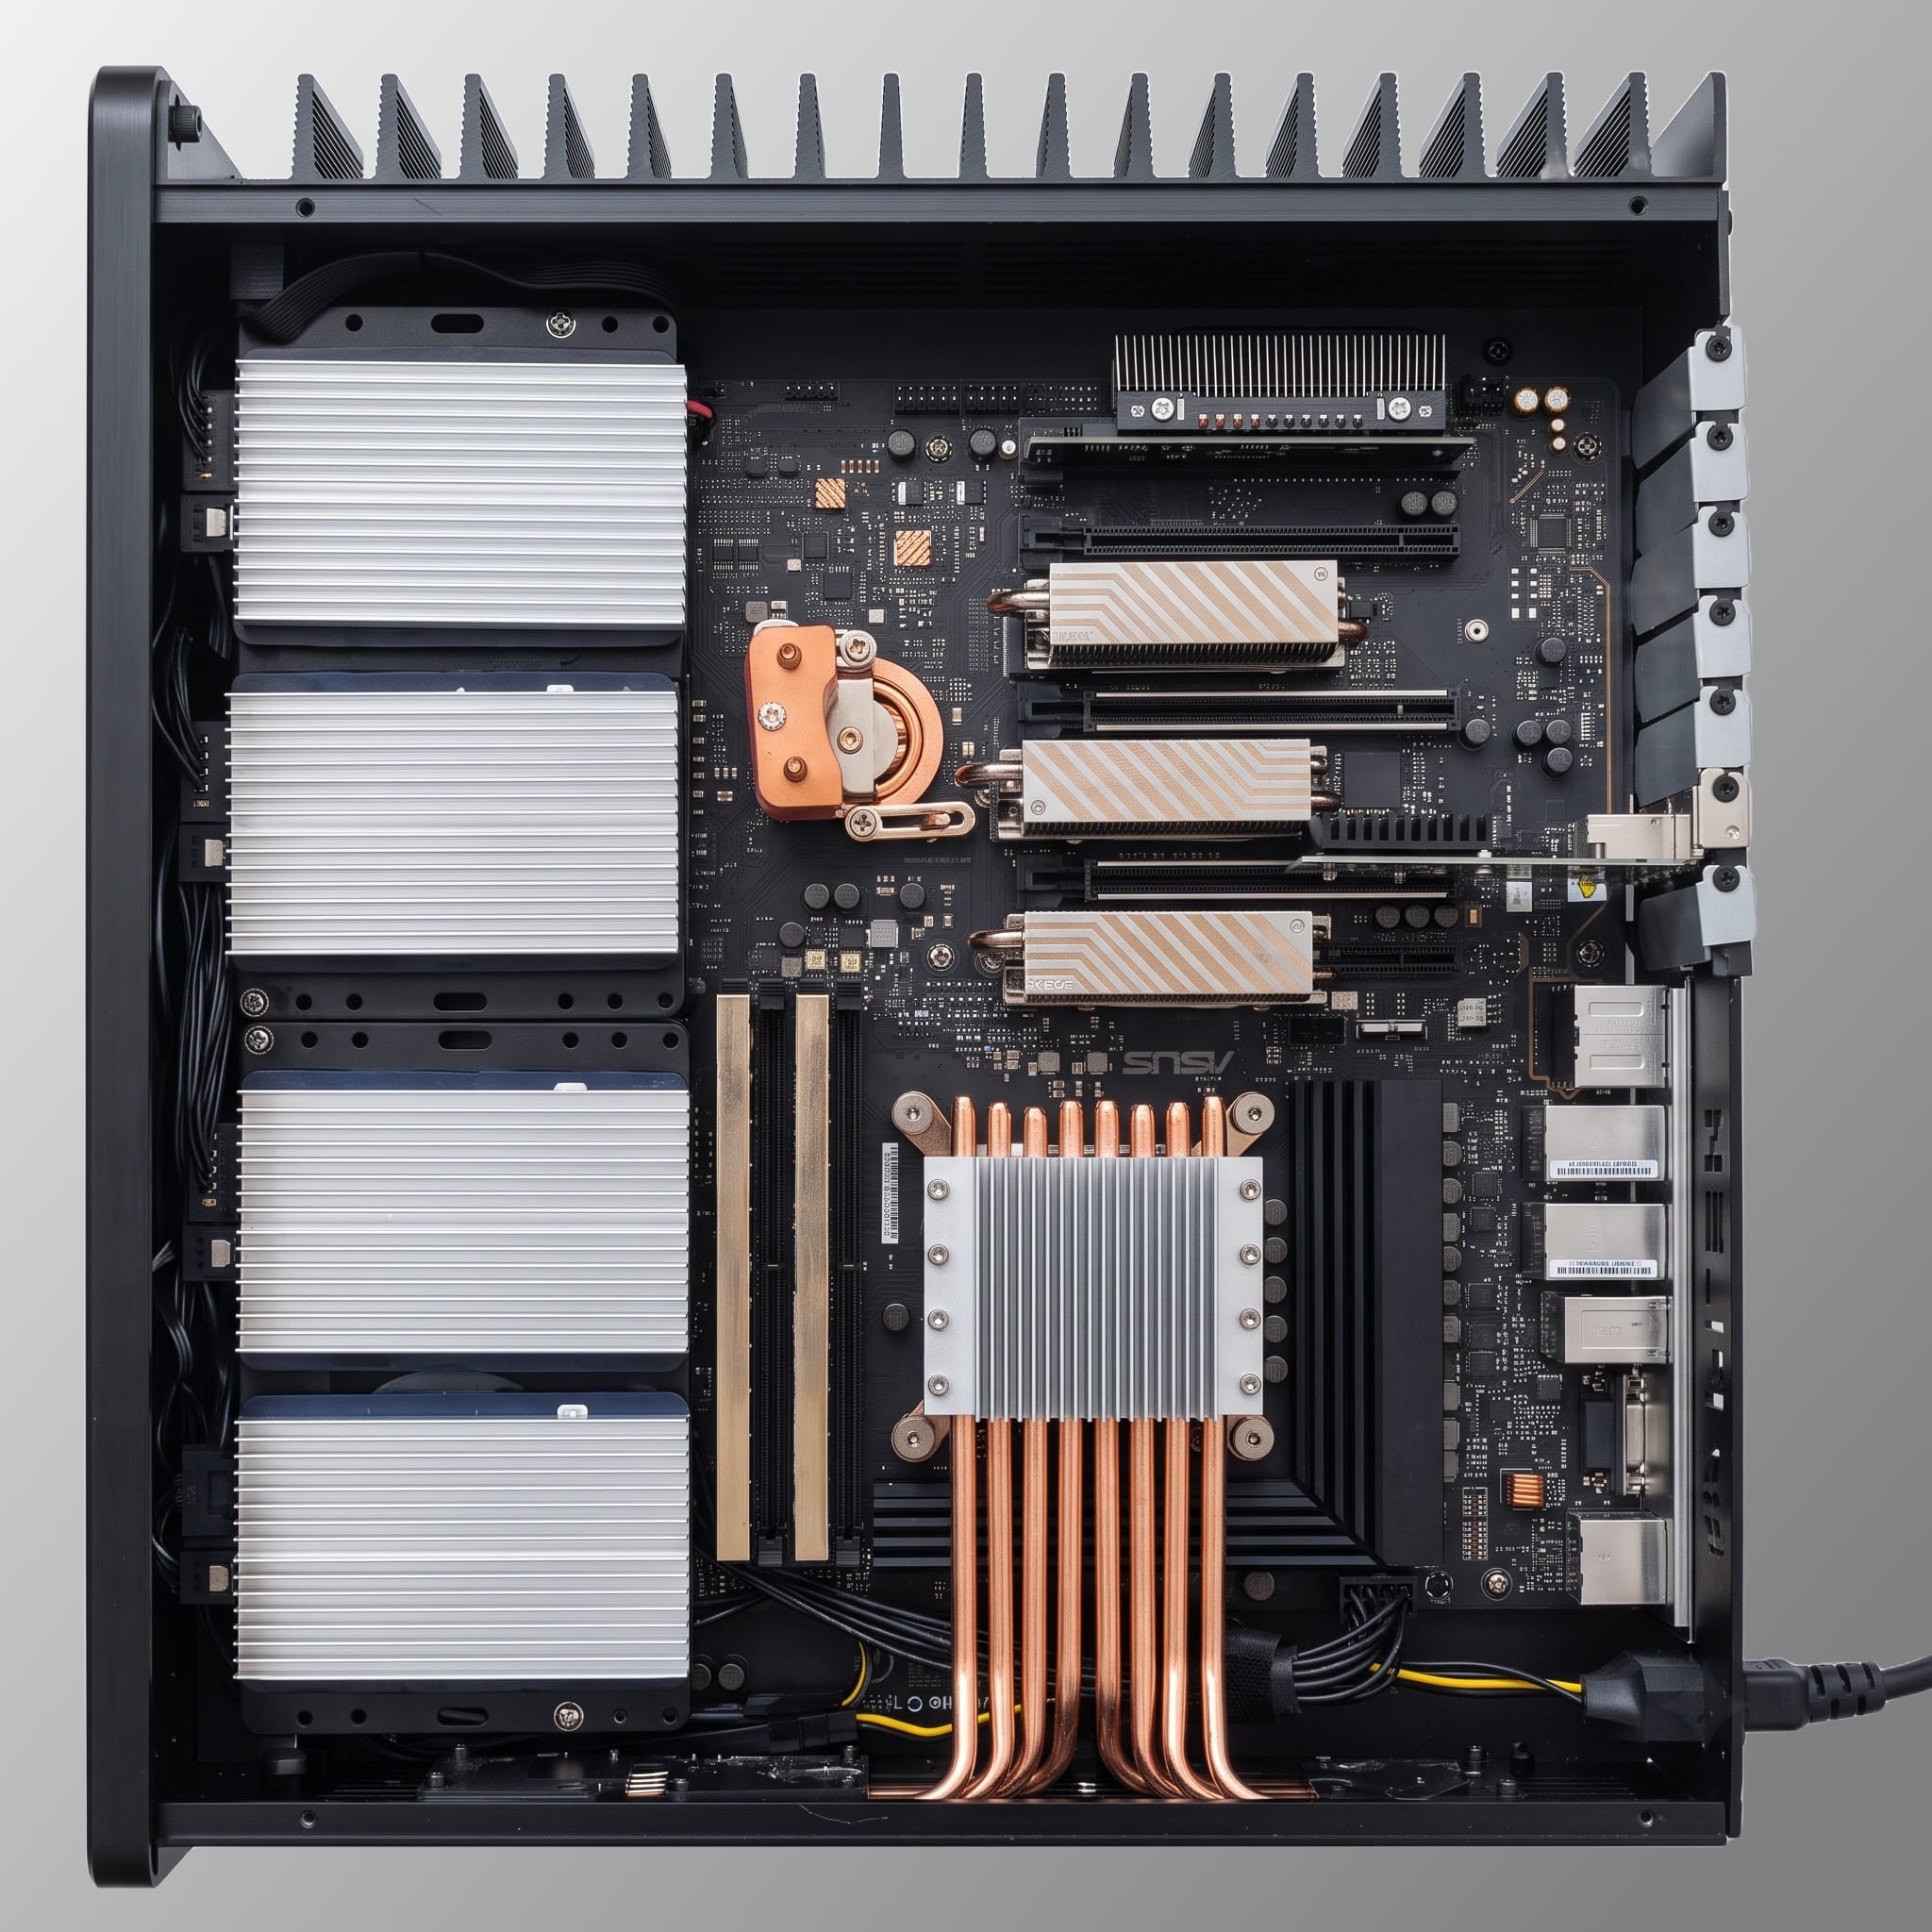
The case and PSU: HDPlex H5 + 250W GaN
For a passive case big enough to take this CPU and an ATX W680, two names kept coming up: Streacom and HDPlex. The HDPlex H5 and H3 take ATX and mATX and are rated for 105W and 85W. Streacom’s cases go up to eATX but recommend staying under about 65W. Both make their own fanless PSUs, Streacom up to 240W and HDPlex up to 500W.
The bigger PSU headroom, the more serious heatsink and CPU cooler kit, and genuinely great support won me over to the HDPlex H5 with the ASUS board. (Larry at HDPlex actually answers questions and is a great guy to deal with.) The HDPlex 250W GaN was then an easy call. It’s well regarded in the SFX scene, and while it’s probably a touch less efficient than a gold-standard Corsair RMx, for a fanless unit this size its efficiency is hard to beat.
RAM
Two sticks of 32GB DDR5 ECC from Kingston at 4800 MHz. They were still affordable back then, they were on the ASUS QVL, and they had the lowest voltage I could find, which matters when you’re chasing every watt.
Storage, which is trickier than it looks
Storage is where this got genuinely hard. For a silent passive system, hard drives are out. They run hotter than SSDs, which is a problem when you have no airflow, and they have an audible signature, especially the big ones. So, SSDs only.
But SSDs vary a lot by form factor and protocol: NVMe, SAS, U.2, SATA. SAS and U.2 I crossed off right away. I couldn’t find a single drive that supports ASPM sleep states, apart from one absurdly expensive Solidigm U.2 that isn’t even confirmed to work this way.
I care about data integrity, so I wanted the drives in a ZFS array, and for ZFS you really want PLP, power-loss protection. If you’re wondering why PLP matters so much: a drive with PLP has onboard capacitors, so it can acknowledge a sync write the instant the data hits its own DRAM cache, because the caps guarantee that cache survives a power cut. A drive without PLP has to actually push every sync write all the way down to flash before it dares confirm it. ZFS does a lot of synchronous writes (the ZIL, metadata, every fsync), so PLP is the difference between snappy and painful sync performance.
Here’s the catch though: PLP NVMe and PLP SATA drives generally don’t support any sleep states either, same problem as SAS and U.2. SATA mostly doesn’t advertise DevSlp, but in my testing SATA is more forgiving and will often drop into a sleep state anyway, even when the drive doesn’t claim to. I confirmed this on a spare ASUS Prime Z790 I had lying around, where enterprise SATA SSDs slept without any fuss. So enterprise SATA is the golden combo. Except it’s slow next to NVMe.
Which is how I ended up splitting it:
- Boot and VMs go on a ZFS array of consumer NVMe.
- Important data goes on a ZFS array of enterprise SATA SSDs with PLP.
So the data I care about gets integrity and failover, and if a consumer NVMe corrupts itself in the normal course of things, well, that’s what backups are for. Right? Right?
My criteria for the enterprise SATA drives were simple: as big and as cheap as possible. I landed on used Micron 5100 ECO and 5200 ECO drives, all 7.68TB, with 20,000 to 40,000 power-on hours but 92% to 100% life remaining and no reallocated sectors.
For the NVMe side I optimized for high TBW. I didn’t want to be swapping drives every couple of years from wear, and newer consumer drives often ship with surprisingly low endurance. A brand-new Samsung 9100 Pro is rated for around 1,200 TBW. The Micron enterprise drives are rated for something like 17,600 TBW, so, not exactly close. I went with 2x 2TB TeamGroup Cardea Zero Z440. Not the fastest, but rated for 3,600 TBW, and at 8% wear after roughly two years they should last a good long while.
The Proxmox OS got its own little ZFS mirror, 2x 64GB Intel Optane M10. These are fun drives. As far as I know they’re the only Optane NVMe (that isn’t bolted to slower memory) that supports sleep states. Their rated 365 TBW doesn’t sound like much, but only the OS writes to it, and relative to capacity it’s actually huge. Scale that endurance up to 2TB and it’d be around 11,000 TBW. The real reason to use Optane for an OS drive is latency and fsync, both of which are absurdly fast.
One warning while I’m on storage: not every NVMe behaves with ASPM, even when it should. I first tried some SanDisk Red NAS NVMe drives, and with ASPM on they flooded my journal with AER errors like nothing else. Not fatal, and maybe you could mask them, but I really didn’t like it. There are similar reports for other drives. Expect some trial and error here.
Networking: the RTL8127 bet
For reliable ASPM, the two cards I kept seeing recommended were Intel’s i226-V 2.5G and the Intel X710-DA2. The X710 has excellent, documented ASPM, but it pulls a fair bit of power and runs hot. Hot enough that a fan is recommended for its heatsink, which would have meant building a custom passive solution for it. The upside would’ve been 10G.
So I started with the i226-V. Then in late 2025 Realtek released the RTL8127 to the public, a 10G chip pulling around 1.5W at peak that, according to a single Reddit post, at least had ASPM capability, even if it wasn’t on by default. I took the gamble and ordered one of the first units off AliExpress. More on how that went shortly.
Going fully passive: the great heatsink hunt
With the parts gathered, a new problem showed up. Most components in a normal PC want at least a little airflow: the chipset cooler, the NVMe drives, the RAM. Going truly passive meant cooling all of it silently, which meant a surprising amount of extra shopping.
The chipset was the worst of it. Big passive chipset heatsinks were everywhere in the 2000s and basically aren’t made anymore, so the second-hand market is your only shot. I went looking for something like a Noctua NC-U6, a chunky copper-heatpipe block that could handle the W680’s roughly 5W TDP. I actually found one, on the website of some obscure local French PC shop. The owner never replied, and a road trip to France for a heatsink was, in the end, a bit much even for me. Patience paid off though. I later found a still-sealed Thermaltake Extreme Spirit II on eBay. What a find. I love old hardware like this. I pulled the fan off and used the bare copper heatsink. It installs exactly like it did 20 years ago, except I treated it to modern thermal paste.
For the RAM I bought the heaviest-duty DDR5 heatsinks I could find, Bykski copper armor blocks. They’re massive, gorgeous, solid copper, and in my opinion stupidly expensive. (I’d have loved one of those old DDR2/3 heatpipe towers, but I couldn’t find any for sale.)
For the NVMe drives I used Thermalright HR-10 heatsinks. Dual heatpipe, big fin stack, more than enough to keep them cool passively. And for the SATA SSDs, generic aluminium heatsinks stuck on with thermal-conductive tape. Nothing fancy, but it works.
The software part
Hardware assembled, the real game started.
BIOS
A user on the Unraid forums reported that one specific BIOS version got him good C-states while a newer one killed them2. Version 4302 was good, 4505 was bad. So I stuck with 4302, which happened to be preinstalled, instead of flashing the latest. The things I changed:
- set C-states from Auto to C10 (C8 also works)
- enabled the relevant power options under Advanced → Platform Misc Configuration
- enabled Aggressive Link Power Management in the SATA tab
First boot: C3, and the onboard NIC tax
I booted with one NVMe and the onboard NIC, installed powertop on a fresh Proxmox install, ran powertop --auto-tune, and got a best case of C3. Not great, but exactly what the HardwareLuxx user saw. The onboard NICs were the anchor, so I disabled both of them and dropped in my own card. First the i226-V, which I knew had newer firmware and allowed deeper C-states. Reboot, and now C6. Better. Pull the NIC entirely and boot with no network at all, and there it was: C10. So the platform itself could do it.
Feeling good, I populated the server with every drive, booted, and got… no C-states at all. Wonderful.
The case of the missing CLKREQ
Trial and error narrowed it down. My one Sabrent PCIe-x16-to-NVMe adapter (Gen5) was killing ASPM on its drive entirely. Turns out the Sabrent board doesn’t pass the CLKREQ# signal from the slot through to the NVMe, and without CLKREQ there’s no ASPM L1 substate. Swapping it for a Silverstone adapter that explicitly supports CLKREQ fixed that. But now I was stuck at C2.
Oddly, no matter which slot I used, the NVMe drives themselves could always reach C10, even on CPU-attached lanes. That already contradicted the HardwareLuxx user (newer BIOS on my end, maybe?), and it even contradicts Matt Gadient’s findings in his excellent 7-watt-idle write-up, which is worth reading if you’re going down this road yourself.
The SATA LTR culprit, and arguing with ASUS
The thing pinning me at C2 was the SATA SSDs. On the spare Z790 they’d slept fine. Here, plugging the Micron enterprise drives into the SATA ports locked me to C2. So I went digging, and it was clear pretty quickly: the LTR values the SATA controller reported with those drives attached were absurdly strict.
Quick aside on LTR if you haven’t met it. Latency Tolerance Reporting is how a PCIe device tells the platform how much latency it can put up with before it needs servicing. The platform takes the worst case across all active devices and uses it to decide how deep an idle state it’s allowed to enter. If one device insists it can only tolerate a few microseconds, the platform won’t go into a deep package C-state, because waking up would take too long for that device. So a single drive screaming “I need to be serviced now” keeps the whole package shallow.3
I figured those over-strict values weren’t right, since the same drive on the same brand’s Z790 reported much more relaxed numbers, so I reached out to ASUS support. The experience was actually decent, even if it didn’t fix anything. ASUS Germany’s server support reproduced my setup and escalated it to their HQ in Asia for testing. There they did get C10 with a SATA drive attached, but only with a consumer Crucial MX500, not an enterprise drive. So they closed it with “please use consumer drives for high C-states.” I still respect that they tested it through that many steps, and honestly, a SATA SSD that supports DevSlp is a fair requirement for deep C-states. I had an MX500 at home and reproduced their result exactly.
But I didn’t want to give up, because I knew it worked on the Z790. The whole problem was that one strict LTR value, so I did the obvious thing: I told the platform to ignore it. Intel’s PMC exposes exactly that knob through debugfs, and on this board the SATA controller sits at LTR index 2:
# Ignore the SATA controller's over-strict LTR value (Intel PMC, via debugfs)
echo 2 > /sys/kernel/debug/pmc_core/ltr_ignore
I wire that up to run at boot in the Ansible role so it sticks across reboots. And, well, it worked great. The system reached C10 again, a stress test turned up no failures anywhere, and long-term monitoring has shown no elevated errors, no read/write trouble, no latency weirdness. Still slightly surprised it’s that clean, but I’ll take it.
The RTL8127 AER storm
With the drives sorted, the real fun began: the RTL8127 10G card. I swapped the i226-V out for it, which dropped me to C6. On first boot, ASPM was disabled for the card, exactly as expected. Because of an old ASPM bug on an earlier Realtek NIC, the general-purpose Linux r8169 driver disables ASPM for this whole family. So I force-enabled it, and saw C10.
Then, about 20 minutes later, the system suddenly dumped a flood of PCIe AER “Unsupported Request” errors into the journal. Thousands of them, then more.
powertop told the story: a core pinned near 100%, and the busiest tasks were irq/NNN-aerdrv, rasdaemon, and journald. Package C-states had collapsed back to 0%. So I was right back where I started. The chain went like this: the NIC was throwing PCIe errors, the kernel’s AER driver fielded every single one, rasdaemon logged them, journald wrote all that spam to disk, and between them they kept a core permanently awake. An awake core means no deep package C-state.
ras-mc-ctl --summary showed the scale of it, millions of “Unsupported Request” and “Header Log Overflow” events on the root port 0000:00:01.0. To figure out what was actually being rejected, I pulled the offending packet straight out of the root port’s AER Header Log:
# Dump the captured TLP from the root port's AER capability
setpci -s 0000:00:01.0 ECAP_AER+0x1c.l   # Header Log DW0
setpci -s 0000:00:01.0 ECAP_AER+0x20.l   # DW1
# DW0 0x34......  -> this is a Message TLP
# DW1 low byte 0x10 -> message code 0x10 = LTR
That cracked it. The rejected packets were LTR messages, and the reason they came back as “Unsupported Request” is a subtle one. The PCIe spec says a device may only send LTR messages if every upstream port all the way to the root has LTR enabled. The RTL8127 has LTR enabled by its firmware/driver, but the mainboard left the NIC’s upstream root port LTR disabled. The moment ASPM L1.2 kicked in (which is what takes ~20 minutes of deep idle to first trigger), the NIC started sending LTR messages, and the root port rejected every one of them as an Unsupported Request. Hence the storm.
The fix is to enable LTR on the root port before ASPM ever engages, so the NIC’s messages are legal and get accepted:
# DevCtl2 = CAP_EXP+0x28, bit 10 = LTR Enable. Set it on the NIC's root port.
ROOTPORT=$(basename "$(dirname "$(readlink -f /sys/bus/pci/devices/0000:01:00.0)")")
setpci -s "$ROOTPORT" CAP_EXP+0x28.w=0400:0400
With LTR enabled top-down, the messages became valid, the storm stopped, the pinned core relaxed, and the package went straight back to PC8/PC10. The NIC’s own LTR value is a permissive ~3ms, so it doesn’t hold the deep states off either. I rolled the whole thing, root-port LTR enable followed by ASPM L1.2, into a small autoaspm.py helper that runs at boot, so it survives reboots and reprovisions.
The last 10%: VMs, interrupts, and a chatty Z-Wave stick
C10 on a completely idle Proxmox host. Finally. But it still wasn’t over, because I migrated an existing Proxmox config onto the new box: a Home Assistant OS VM, LXCs for a reverse proxy and AdGuard and friends, and three full VMs for Immich, media, and other Docker services. I’d used VMs there specifically to avoid the occasional headaches of running Docker inside an LXC, which Proxmox doesn’t recommend.
Energy comes with tradeoffs though. Those multi-vCPU VMs generated a constant stream of wakeups and interrupts for even trivial syncs and timers, and that’s fatal for package C-states. The reason is that a package C-state needs all the cores in a deep core C-state at the same time. The deep package states power down shared stuff, the L3 cache, the memory controller, the voltage rails, and that’s only safe when nothing is running. One core getting woken every few milliseconds by a chatty VM timer is enough to keep the whole package out of PC8/PC10 forever.
So I converted most of those VMs to LXCs, and to my surprise that cut the interrupt load from those three services by more than 10x. The last holdout was the Home Assistant VM, which refused to allow any C-states while it was running. The culprit was my Z-Wave antenna, a ZWA-2, connected over USB and passed through to the VM. My other USB device, a UPS, never caused any trouble, so I hadn’t suspected it, but the USB passthrough traffic completely killed sleep. Lucky for me, the ZWA-2 and Nabu Casa are great about this. There’s optional firmware to make the ZWA-2 connect over Wi-Fi or PoE instead. I don’t have PoE handy, so I flashed it to Wi-Fi mode. Still rock solid, and the C-state problem was gone.
The result: 15W at idle
After all of that, here’s where it landed:
| Configuration | Power draw |
|---|---|
| Full stack running: all VMs and LXCs doing their normal thing | ~20–24W |
| Bare idle, no VM or LXC online, everything still connected | ~15W |
| Bare idle, without the enterprise SATA array | ~10–11W |
15 watts at bare idle, with every drive and a 10G NIC attached. That number is with nothing actually running, no VMs or LXCs online, which is the figure I was chasing while tuning C-states. In day-to-day use, with the whole stack up (Home Assistant, the proxy, AdGuard, Immich, media, and the rest), it sits around 20 to 24W. Drop the power-hungry enterprise SATA array and bare idle falls closer to 10 to 11W. Either way, this is a 14-core/20-thread ECC machine that’s also a NAS and a transcoding box, drawing about what a light bulb does. That’s within reach of the dedicated N100 builds people point you at, except this one has ECC, real compute headroom, and 36TB of all-flash storage behind it.
And since the whole thing is fanless and runs on SSDs, it’s dead silent. You genuinely cannot hear it in the room.
What’s next
It was a long road to get here, and the project never really ends. Right now I’m building a second machine, a dirt-cheap ECC Proxmox Backup Server around a C246 BKHD AliExpress board and an i3-9100. That one’s going to take a while, and it’s a story for another post.
Resources
There’s more written about low-power servers than you’d expect, and a lot of it is in German, since the high electricity prices here make it a bit of a national pastime. The places I leaned on most:
- HardwareLuxx, the German hardware forum, great for idle-power and W680 ASPM threads.4
- Wolfgang’s Channel on YouTube, for genuinely good deep dives on efficient NAS and server builds.5
- Matt Gadient’s blog, home of the famous ~7-watt-idle build.6
- The Unraid forums. I run Proxmox, but the board- and BIOS-specific reports there are gold.2
- ServeTheHome forums, for board and component experience.7
- and a pile of scattered Reddit threads, including the one that talked me into gambling on the RTL8127.
Footnotes
-
A concrete explainer of why a package C-state is effectively the shallowest core’s state, so one busy core blocks the whole package, is metebalci’s CPU power-management tutorial. The Thomas-Krenn wiki on P-states and C-states is a good plain-language intro too. ↩
-
The long UnRAID-on-ASUS-Pro-WS-W680-ACE thread is where the board’s BIOS-version-versus-C-state behaviour gets picked apart. ↩ ↩2
-
Synopsys has a clear write-up of the PCIe L1 sub-states and how LTR gates L1.2 entry, and the Rambus PCIe glossary defines LTR itself. For the Linux side there’s the kernel ASPM documentation. ↩
-
The HardwareLuxx thread “Vergleich: Leistungsaufnahme ECC-fähiger LGA-1700 Mainboards” compares W680 boards for ASPM and package C-states. ↩
-
Wolfgang’s “Building a Power Efficient Home Server!” is the video I’d point anyone to first on cutting idle power. ↩
-
Matt Gadient, “7 watts idle on Intel 12th/13th gen”, plus his companion 9W idle 4-drive NAS build. ↩
-
The ServeTheHome forums, and their RTL8127 NIC review, are great for board and component experience. ↩
Questions, corrections, or want to nerd out about idle wattage?Drop me a line — or poke around theAnsible repothat codifies all of this.
back to the portfolio